Water Filtration Science Project
A water filtration science project is a simple and interesting experiment that helps students understand how filtration can remove visible impurities from water. It is suitable for elementary, middle school, and high school students, with the experiment becoming more detailed as the grade level increases.
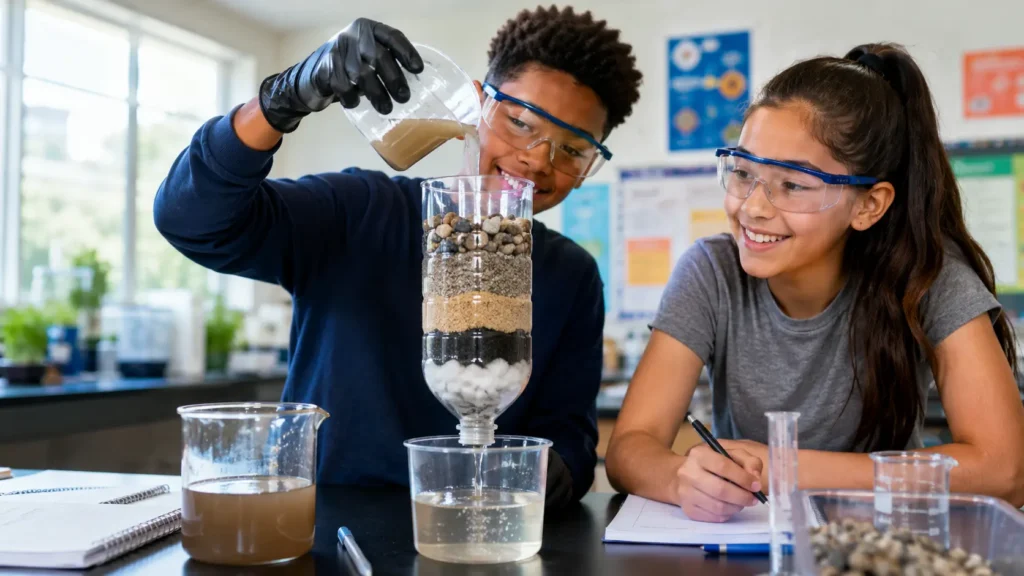
In this project, students create a basic water filter using materials such as a plastic bottle, cotton, gravel, sand, and activated charcoal. The experiment demonstrates how different filter layers can trap particles and improve the appearance of dirty water.
Important: Water that passes through this homemade filter is not automatically safe to drink. The experiment is designed to study filtration, not to produce drinking water.
Project Title
Water Filtration Science Project: How Different Filter Materials Clean Dirty Water
Project Type
Science Experiment / Environmental Science Project
Suggested Grade Levels
Grades 5–12
Main Science Topic
Filtration, mixtures, water quality, environmental science, and physical separation.
Objective
The objective of this water filtration science project is to investigate how different filtering materials can remove visible impurities from dirty water.
Students will:
- Build a simple water filtration system.
- Observe how water changes after filtration.
- Compare different filter materials.
- Record observations and data.
- Understand the basic science behind filtration.
Research Question
How effectively can different filtration materials remove visible impurities from dirty water?
For an advanced project, students can investigate:
How does changing the thickness or order of filter layers affect the clarity of filtered water?
Hypothesis
If dirty water is passed through layers of cotton, activated charcoal, sand, and gravel, then the filtered water will become clearer because the different materials will trap or reduce suspended particles.
Students may write their own hypothesis before beginning the experiment.
Materials
You will need:
- 1 clean plastic bottle
- Cotton balls or cotton cloth
- Fine sand
- Coarse sand
- Small gravel or pebbles
- Activated charcoal
- 2 clear containers
- Dirty water prepared specifically for the experiment
- Scissors
- Spoon
- Measuring cup
- Coffee filter or filter paper
- Rubber band or tape
- Labels or marker
- Safety goggles
- Gloves, if available
Making the Test Water
For a safe classroom experiment, prepare artificial dirty water using clean tap water mixed with small amounts of soil, sand, and leaves.
Do not use sewage, toilet water, chemicals, or unknown contaminated water.
Step-by-Step Procedure
Step 1: Prepare the Bottle
Ask an adult to cut the bottom off a clean plastic bottle.
Turn the bottle upside down so the bottle opening faces downward.
Step 2: Add the First Filter Layer
Place cotton balls or folded cotton cloth near the bottle opening.
This layer helps prevent larger particles from passing through the opening.
Step 3: Add Activated Charcoal
Add a layer of activated charcoal above the cotton.
Activated charcoal has many tiny pores and is commonly used in water-treatment systems to help remove certain substances and odors.
Step 4: Add Fine Sand
Add a layer of clean fine sand above the charcoal.
The sand provides many small spaces through which water must pass.
Step 5: Add Coarse Sand
Add a layer of coarse sand above the fine sand.
This creates another filtering stage for suspended particles.
Variables
Independent Variable
The filter material, filter-layer arrangement, or thickness of the layers.
Dependent Variable
The visible clarity or amount of visible particles in the filtered water.
Controlled Variables
Keep these conditions the same:
- Amount of dirty water
- Type of dirty water
- Bottle size
- Amount of each material
- Container size
- Testing procedure
- Observation method
Data Table
Students can record their observations using the table below.
| Trial | Water Before Filtration | Water After Filtration | Visible Particles | Flow Speed | Clarity Rating |
|---|---|---|---|---|---|
| 1 | Very cloudy | ||||
| 2 | Very cloudy | ||||
| 3 | Very cloudy |
Optional Clarity Scale
Use a simple scale:
1 = Very cloudy
2 = Cloudy
3 = Slightly cloudy
4 = Mostly clear
5 = Very clear
Results
After completing the experiment, students should compare the water before and after filtration.
A sample result might be:
The water appeared noticeably clearer after passing through the filtration system. Larger particles were trapped by the gravel and sand layers, while the cotton helped prevent smaller particles from passing through the bottle opening.
Students should record their actual observations rather than copying sample results.
Science Vocabulary
Filtration
A process used to separate particles from a fluid by passing the fluid through a filter.
Filter
A material or device that allows some substances to pass while trapping others.
Mixture
Two or more substances physically combined without forming a new chemical substance.
Impurity
An unwanted substance present in a material.
Sediment
Small particles of soil, sand, or other material that settle in water.
Activated Charcoal
A highly porous form of carbon used in filtration and adsorption processes.
Suspended Particles
Small particles that remain floating in water instead of immediately settling.
Variable
A factor that can change in an experiment.
Hypothesis
A testable prediction about what will happen in an experiment.
Observation
Information collected by using the senses or measuring instruments.
Control
A condition kept unchanged so that experimental results can be compared fairly.
Display-Board Layout
A well-organized science project display board can make the experiment easier for teachers and visitors to understand.
Left Section
1. Project Title
Water Filtration Science Project
2. Objective
Explain what you wanted to investigate.
3. Research Question
Write the question being tested.
4. Hypothesis
Write your prediction.
Center Section
5. Materials
Add a short list and photographs of the materials.
6. Experimental Setup
Include a labeled photograph or drawing of the bottle filter.
Label:
- Gravel
- Coarse sand
- Fine sand
- Activated charcoal
- Cotton
- Dirty water
- Filtered water
7. Procedure
Number the main steps from 1–10.
Right Section
8. Data Table
Display your experiment results.
9. Results
Explain what changed.
10. Conclusion
State whether your hypothesis was supported.
11. What I Learned
Add three to five important lessons.
12. Safety Notes
Include the main safety rules.
Presentation Questions
Teachers or judges may ask questions such as:
1. Why did you choose this project?
Sample Answer:
I chose this project because clean water is important for people and the environment, and I wanted to understand how filtration works.
2. Which material removed the largest particles?
Sample Answer:
The gravel and coarse materials helped trap larger visible particles.
3. Why did you use several filter layers?
Sample Answer:
Different layers have different particle sizes and functions, so several stages can improve physical filtration.
4. Why did you use activated charcoal?
Sample Answer:
Activated charcoal has a large internal surface area and can adsorb certain substances.
5. Can you drink the filtered water?
Sample Answer:
No. The homemade filter is for demonstration and experimentation. It does not guarantee that the water is safe to drink.
6. What was your independent variable?
Sample Answer:
The independent variable was the filter material or arrangement of the filter layers.
7. What was your dependent variable?
Sample Answer:
The dependent variable was the observed clarity of the filtered water.
8. Why should you repeat the experiment?
Sample Answer:
Repeating the experiment helps make the results more reliable and reduces the chance that one unusual trial affects the conclusion.
Safety Notes
- Wear safety goggles during the experiment.
- Use only clean materials.
- Never taste or drink experimental water.
- Do not use sewage or unknown contaminated water.
- Do not use household chemicals in the experiment.
- Have an adult cut the plastic bottle.
- Wash hands after completing the project.
- Keep the work area clean and dry.
- Dispose of used materials properly.
- Clearly label experimental water as NOT FOR DRINKING.
Printable Project Worksheet
Water Filtration Science Project Worksheet
Student Name: ______________________________
Grade: ___________
Date: __________________
1. Project Title
2. Objective
What are you trying to find out?
3. Research Question
4. Hypothesis
I predict that:
because:
5. Materials
- Plastic bottle
- Cotton
- Sand
- Gravel
- Activated charcoal
- Container
- Dirty test water
- Measuring cup
- Safety goggles
6. My Filter Design
Draw and label your filter:
Gravel: __________________________
Coarse Sand: _____________________
Fine Sand: _______________________
Activated Charcoal: ______________
Cotton: __________________________
7. Observations
| Trial | Before Filtration | After Filtration | Clarity Rating |
| 1 | |||
| 2 | |||
| 3 |
8. Results
What happened to the water?
9. Conclusion
Was your hypothesis supported?
10. What I Learned
One thing I learned:
A second thing I learned:
A third thing I learned:
How to Make This Project More Advanced
Older students can make the project more scientific by testing one variable at a time.
For example, compare:
- Sand-only filtration
- Gravel + sand filtration
- Gravel + sand + charcoal filtration
- Different thicknesses of sand
- Different orders of filter materials
Students can then compare the results and create a bar graph showing their observations.
For high-school-level work, students can discuss turbidity, particle size, adsorption, water treatment, experimental controls, repeatability, and limitations.
Frequently Asked Questions
What is the purpose of a water filtration science project?
The purpose is to demonstrate how filtration can separate some visible particles from water and to help students understand a basic water-treatment principle.
What materials can be used to make a water filter?
Common demonstration materials include cotton, gravel, sand, and activated charcoal.
Does a homemade water filter make water safe to drink?
No. A classroom filtration model should not be considered a drinking-water treatment system.
Which filter material is best?
There is no single material that removes every type of contaminant. Different materials work in different ways, which is why real water-treatment systems often use multiple treatment stages.
How can I improve my science project?
Repeat the experiment, measure the same variables each time, use a data table, take photographs, create a graph, and clearly explain the limitations of your experiment.
Water Filtration Science Project: Complete Student Guide
Water Filtration Science Project A water filtration science project is a simple and interesting experiment that helps students understand how

Back to School Essay: A New Beginning for Students
Back to School Essay: A New Beginning for Students The end of summer vacation brings a special feeling to students.
Improve Credit Score Fast: 15 Proven Strategies That Really Work

How to Build a $100,000 Investment Portfolio From Scratch (2026)
Growing your first $100,000 can feel overwhelming. Maybe you’re wondering whether you should buy stocks, invest in ETFs, contribute more

Oral Cancer: Causes, Symptoms & Prevention Guide
Oral Cancer is a serious health condition, and it affects thousands of people every year. Moreover, it can develop in

Passive Income Ideas for Beginners With No Money (Start Today & Earn Smart)
Introduction Passive Income Ideas for Beginners With No Money. Everyone wants to earn money easily. However, most people think money is